This page lets you learn the software including the settings of pigment, the controls of the brush, A.I. calligraphy, and many more. The bottom of this page includes demonstration videos. This PowerPoint file summarizes the learning and gives you a quick start to use the software.
Hotkeys
Hotkey
Function
B
Long-hair Brush
Shift + B
Short-hair Brush
Mouse Left Click
Vertical Brush
Mouse Left + Right Click
Side Brush
X
Swap (Vertical, Inclined Brush)
Shift + MouseWheel
Brush Inclination
Up/ Down Key
Brush Inclination
Ctrl + MouseWheel
Brush Size
Left/ Right Key
Brush Size
Shift + Mouse Drag
Broken Brush
Ctrl + Mouse Drag
Brush Pressing More
Alt + Mouse Drag
Brush Pressing Less
Up/ Down Key (while drawing)
Brush Pressing
Mouse Wheel (while drawing)
Brush Pressing
Mouse Wheel (for Inclined Brush)
Brush Rotation
Number Key 1-9
Ink Volume in Brush
,/ .
Adjust Wetness
(For Mac, please use 'Command' instead of 'Ctrl')
Hotkey
Function
E
Eraser
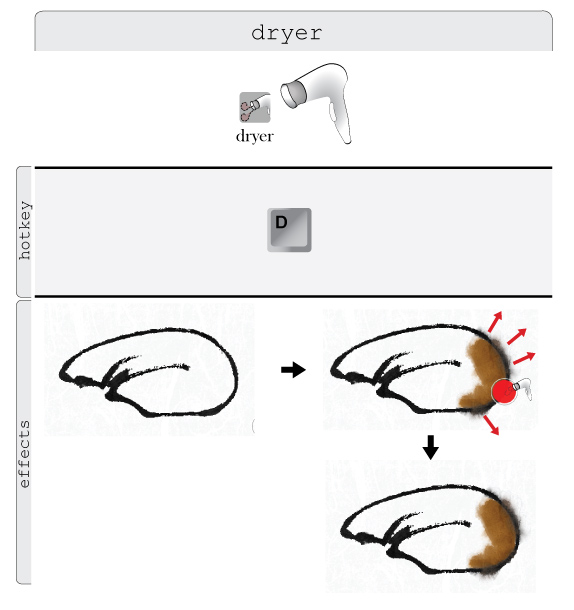
D
Dryer
S
Sprayer
F
ColorFlusher
A
Arrow
T
Text
I
Dropper
Z
Zooming In
Tab
Freeze/Enable Diffusion
Alt
Zooming Out (after Zooming In is selected)
Alt + Mouse Wheel
Zoom in and out
Space Bar
Drag the Paper
Ctrl + N
New Paper
Ctrl + M
Clear Paper
Ctrl + S
Save
Ctrl + Alt + S
Save As
Ctrl + Z
Undo
Ctrl + Y
Redo
(For Mac, please use 'Command' instead of 'Ctrl')
Pigment
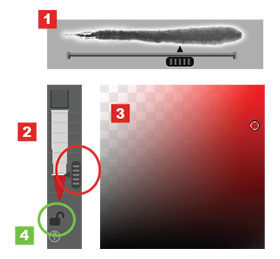
The setting of pigment is important in Pure ink in order to paint as you wish. Pigment does not mean color only. It is determined by three factors which are: 1. pigment wetness, 2. brush load, and 3. color, and they are controlled through different tools as shown in this figure.
1. Pigment wetness is the amount of water to dilute the pigment. It affects the concentration and thus the opacity of the pigment. Besides, dilute pigment diffuses more than the concentrated pigment. 2. Brush load represents the amount of pigment carried by the brush. It affects the continuity of strokes but not the concentration (and thus opacity) of pigment. 3. Color determines the color value. Light colors are less opaque than dark colors.
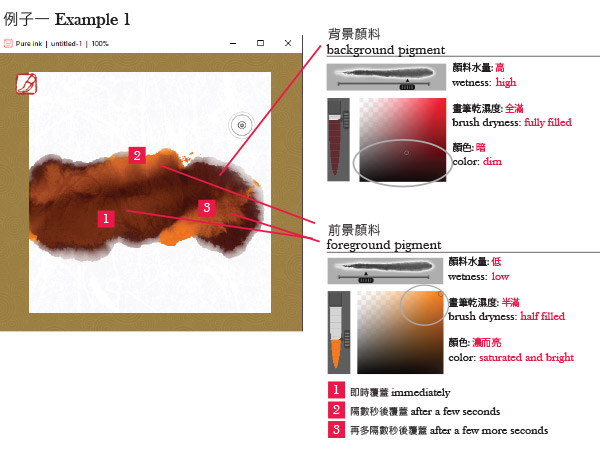
This table summarizes the combinations of different pigment wetness and brush load for different effects. The combination in the first row is particularly useful for pigment overlapping.
Wet pigment can diffuse. To maximize the effect of diffusion, maximize the wetness of the pigment in foreground and background.
The wetness value of pigment determines its concentration and thus the opacity. Low wetness makes pigment more concentrated and thus more opaque. This makes it easier to overlap on the other pigments and creates a sense of hierarchy.
Brush
Professional Brush produces stroke with various effects through all-round manual settings
Each Easy Brush produces one specific effect of stroke by presetting and locking most of the brush settings. Users do not have to set the brush by themselves for the effects.
Pure ink provides two types of brushes: Long-hair Brush and Short-hair Brush .
Ink artists mainly use wolf-hair brush to create various strokes by different techniques. Pure ink programs the mechanism to simulate vertical brush, side brush, inclined brush and broken brush.
Vertical brush is achieved by pressing the left button of the mouse.
Side brush is achieved through clicking the left button first, followed by clicking both the left and the right button. For Wacom pressure stylus, the button on the side of the pen barrel is equivalent to the right button of the mouse. Simply hold down this key with your thumb while drawing to activate side brush.
Inclined brush can be transformed from vertical brush by pressing 'Shift' key and rolling the mouse wheel together, or by pressing the 'X' key (also read 'brush adjustment').
Broken brush can be made by pressing the 'Shift' key while drawing to created broken strokes.
If mouse is used to control the brush, then the inclination, the size, and the rotation of the inclined brush can be controlled conveniently by using the 'Shift', 'Ctrl' (or 'Command' in Mac), and 'Alt' key.
If Wacom pressure stylus is used to control the brush, then the inclination and the size of the brush can be controlled conveniently by different keys on keyboard. For the rotation of incined brush, advanced pressure stylus can detect the rotation of the pen by itself. Otherwise, control the rotation via the rotation button on Pure ink interface.
By using mouse, pressure change on the brush can be achieved via different hotkeys to produce various effects on stroke.
By using Wacom pressure stylus, usually pressure change is automatically simulated through the pen.
The side brush can achieve a more flexible side-wiping effect between the vertical brush and the inclined brush. After the vertical brush is pressed onto the paper, the pen tip can maintain the bent angle for dragging. A stroke is initialized from the vertical brush and achieves the effects of inclined brush, making the lines more numerous and realistic.
In operation, first press the left button of the mouse to start by using a vertical brush. By taking the case of drawing "/" as an example, according to the general technique, the brush should first draw from top left to bottom right and then turn to bottom left. When drawing toward the bottom left, press the right button of the mouse (i.e., hold down the left and right buttons at the same time), and you can drag out a thicker line. After releasing the right button, the brush will automatically return to the vertical state and continue drawing.
If you use a Wacom pressure stylus, the button on the side of the pen barrel is equivalent to the right button of the mouse. Simply hold down this key with your thumb while drawing on the drawing board with the pen to produce the same effect.
By using side brush, we can practise Mogu (“boneless technique” in Chinese ink painting, to create form by ink and color washes rather than by outlines)in a better way in the software. For example, we can apply this to draw Orchid.
The brush panel provides detailed settings for the brush. Brush Release determines how fast the brush is released from the paper. Stabilizer controls the smoothness and roundness of stroke. Anti-alias is a function to either turn the stroke edge to be crispy or soft. Stroke with crispy edge is more suitable for freehand ink painting. Pigment Consumption allows the pigment in brush to be consumed continuously if it is unlocked and this adds variation to the strokes.
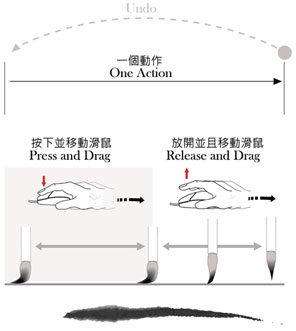
When the mouse button is released, the brush tip does not lift up from the paper immediately but gradually as the mouse dragges and this produces a narrow tail for a stroke. Pure ink considers the process from pressing down the mouse button to the moment that the brush tip leaves the paper as one single action for undo.
If the mouse button is pressed down again before the brush tip leaves the paper totally, the new stroke is still considered as the extension of the last stroke. Two strokes belong to the same action for undo.
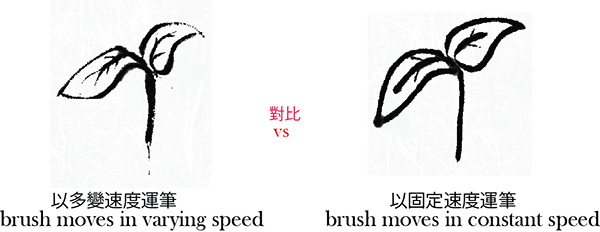
To draw a nice stroke, move your brush with varying speed.
The brush in ink art is highly elastic and the paper for ink art absorbs water heavily. The speed of brush determines the amount of pigment being absorbed by paper and thus the shape of the stroke. A brush moving with varying speed creates dynamic stroke with interesting changes of shapes.
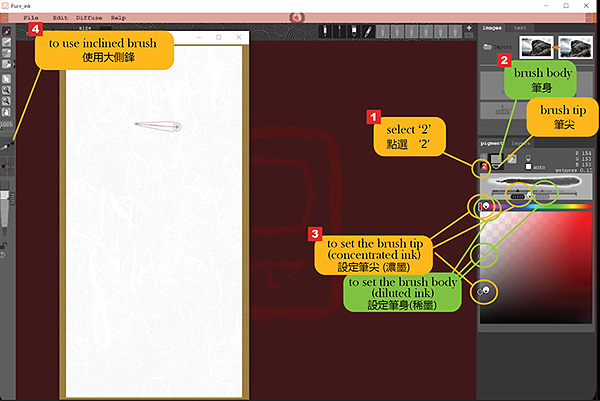
The brush tip and body can carry ink with two different concentrations or two different colors. Such a "One Brush Two Colors" approach is commonly used in Flowers and Birds painting. To do so, first of all go to select '2' in the Pigment panel (index 1 in the following image). Then individually select the half circle or the rectangle icon which represents the brush tip and brush body for pigment settings accordingly (index 2).
Brush tip and brush body have three independent pigment selectors, which includes the wetness, hue, and the color value selector (index 3). To make good use of "One Brush Two Colors", use inclined brush (index 4).
Easy brush and other assistant tools
The software provides multiple easy brushes with preset settings for different desired effects. Users do not have to set advanced items like wetness and brush load.
After selecting easy brushes, user can only adjust several basic features of the brushes (size, inclination, color)
If you want to fine-tune an easy brush, first select the easy brush and then convert it to a long-hair or short-hair brush. The settings that were originally set and locked for the easy brush will be unlocked for fine-tuning.
Washable Sketch is used for sketching, which can be washed out by pigment. All sketch can be removed at once by selecting "Clear Sketch" in File menu
Sprayer adds water on paper and make pigment diffuse more vigorously.
Dryer removes water from paper and stop pigment diffusion.
Color Flusher flushes pigment toward one of the four corners (top left, top right, bottom left, bottom right). The Color Flusher from drawing toolbar flushes pigment in a small portion that is set by the size of the flusher. The Color Flusher activated by the Flush option in Diffuse menu flushes all pigment on the paper.
Lanting A.I. system of calligraphy
Select “Zhao Running Script” from the text panel at the top right hand corner of the interface. For the first time of running this system in every time of executing the software, the system takes ten seconds to three minutes of time for initialization (the actual duration depends on the machine). Then select either horizontal or vertical typing tool, click on the paper and start creating running scripts by Chinese input methods or by text pasting. The scripts will be stored in text layer.
For the Mac version, the Chinese input method is not yet supported by Pure ink, please use a copy-and-paste approach to input Chinese characters.
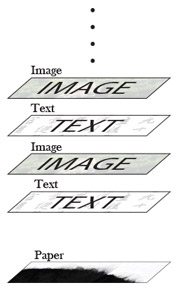
Transfer and tracing (with layers)
Only the paper layer can be painted. Image and text are placed on top of the paper as image or text layers.
Input image by ‘Import Image’ (figure 1).
Using horizontal or vertical typing tool to type text (figure 2).
Image, calligraphy, or text can be transferred to the paper layer with diffusive effect. The image or text that are transferred to paper are no longer editable but become paintable.
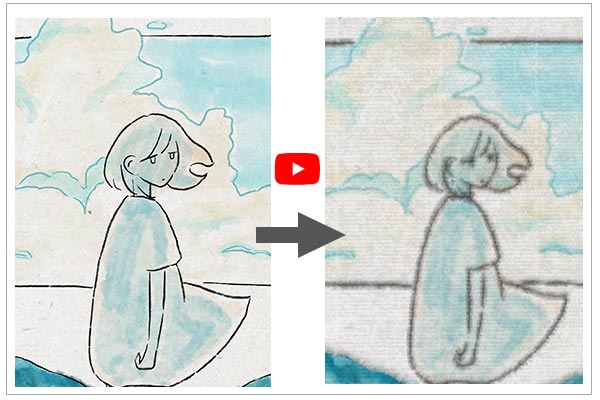
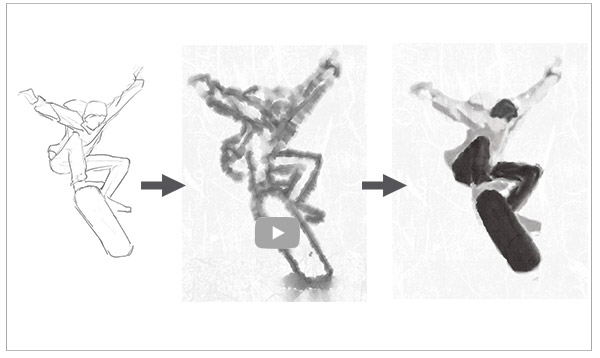
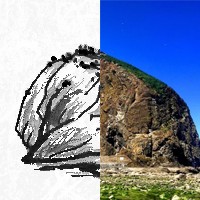
We can add ink style to any digital painting by this function. Firstly we finish a digital painting by other painting software and export the work as jpg or png format (including transparent png format). Then we can import it into Pure ink and convert it to an ink style painting by such function. Heidi Yip took this approach to bring the texture of rice paper (Xuan paper) and color diffusive effect to her digital painting.
Artist: Heidi Yip
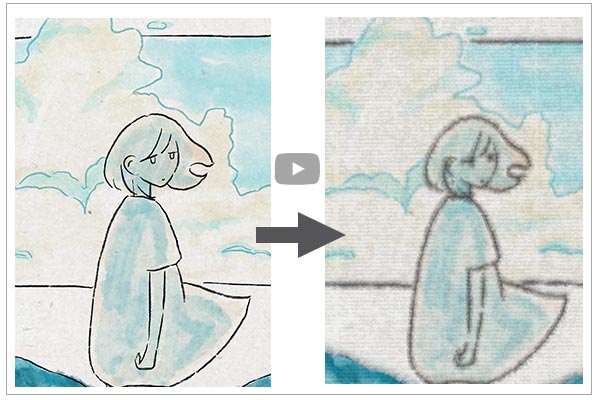
Vivian Kwok is the artist of this example. She finished a quick sketch by other painting software first and turned it into a transparent PNG file. She then imported it into Pure ink and produced a strong diffusive effect on the sketch by the image diffusion function. After this she fine tuned the effect by different drawing tools in Pure ink to complete the work. This is another good example demonstrating the advantage of this function. Please be reminded that the success of this example is turning the sketch into a transparent PNG file first. This can maximize the diffusion effect of strokes in the sketch.
Artist: Vivian Kwok
By adjusting the opacity of the image or text layer, we can achieve tracing for image or calligraphy
The brush in Pure ink is primitively designed for painting. To write calligraphy, set the pigment and operate the brush according to the following suggestion
Export
Selecting 'Export Paper' only exports the paper layer as an image. Selecting 'Export All' exports all visible layers as an image.
For ‘High-res Output’, this function only outputs content of paper layer as TIFF image in high resolution. To include content of image and text layers in your high resolution TIFF file, they need to be transferred to the paper first.
How to ......
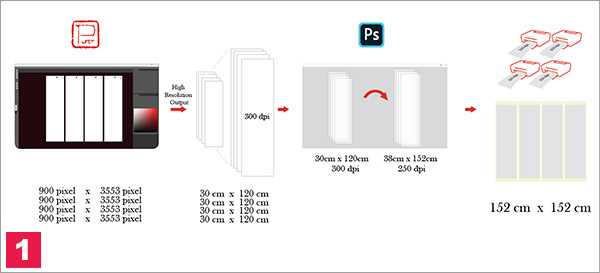
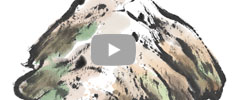
First of all we have to manage the size. Pure ink can export paintings in high resolution of 300dpi. In this example, we open a piece of vertical paper with size of 900 pixels x 3553 pixels. The print size of it after high resolution output is 30cm x 120cm and its corresponding image size is 3600 pixels x 14212 pixels. Based on this, how can we enlarge the print size but keep the print quality as much as possible?
The idea is to slightly tune down the printing density (i.e decrease the resolution) and slightly increase the image area (i.e. increase the number of pixels) in exchange for a larger increase in the printing area. We slightly reduced the resolution of the high resolution image exported from Pure ink to 250 dpi by Photoshop, we further increased the image area slightly by 11% to 3803 pixels x 15009 pixels, then the printing area could be increased by 60% to 38 cm x 152 cm. Since Pure ink can open four pieces of paper at the same time, we use this feature to create four parallel paintings in the software, that is, to create one large painting composed of four vertical paintings. The four vertical paintings were upscaled for printing as described above. The final combination of the four paintings results in a work of 152cm x 152cm, or 5 square feet (Figure 1).
We used the following computer configuration to operate, and the process is generally smooth:
OS: window 10
CPU: Intel(R) Core(TM) i7-8700 CPU @ 3.2GHz
RAM: 64 GB
Graphic card: NVIDIA GeForce RTX 2080
In Pure ink, we opened four pieces of vertical paper next to each other and randomly added pigments and strokes with different concentrations on them simultaneously. Figure 2 is the final look of this work in this stage.
We developed a landscape painting based on this by refining each area every time. We had to enlarge the paper covering that area and its side at the same time to add details and this could ensure continuity between two pieces of paper.
For example, by imagination, we turned the gray colors on the top left corner of the work to rocks according to the traces of pigments. We used an eraser to erase pigments and created rivers and waterfalls in the middle of the work. We painted trees at the right hand side of the work.
Since the print size of the work would be increased by Photoshop later. The richness of detail displayed on the computer screen at the original size still appeared sparse when printed on the paper. It is necessary to enlarge the drawing paper to double for fine tracing, so that the picture can have a rich sense of detail after printing. Figure 3 is the final look of the work in Pure ink.
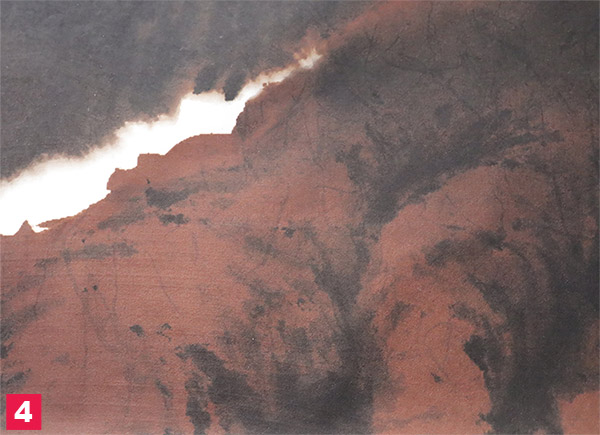
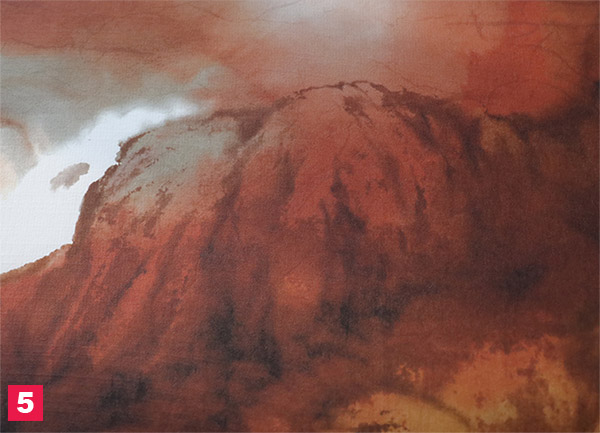
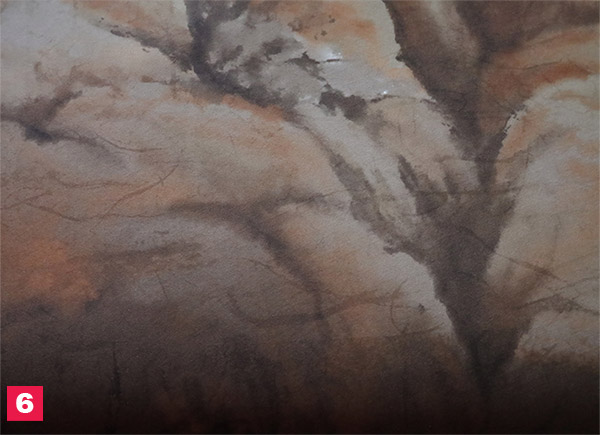
After this, we outputted each piece of paper individually at a high-resolution level and enlarge their size according to the explanation above. To adapt the settings of the printer and the printing materials, the color contrast in the image of the work underwent a one-time color adjustment in Photoshop before being printed. The work was then printed on rice paper (Xuan 宣紙) through the technique of Giclee Print. Figure 4 - 6 are the details of the printed image.
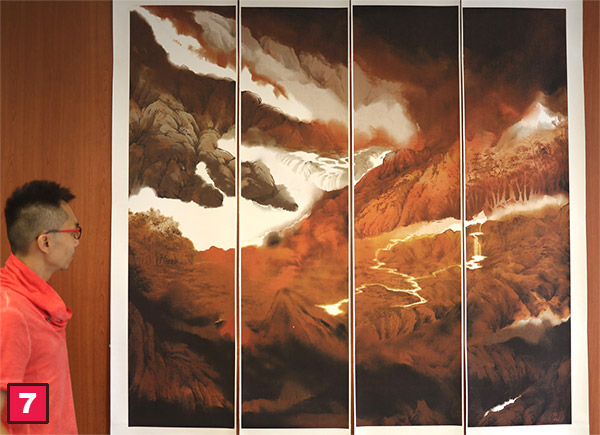
Since the printing material is rice paper. Its softness allows us to mount the work as Chinese scroll by traditional way. Finally the four scrolls were hung side by side. Figure 7 is the final look of “To See the Vast Nan Xu, the Boundless Bei Gu”.
To evaluate the performance of Pure ink in ink painting, no hand drawn element was added on the printed paper unless the signature. Only a mouse and keyboard are used to do the painting. No pressure stylus is used.
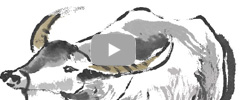
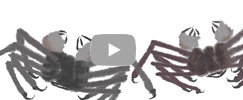
The whole process is summarized as a video and put on top of this article
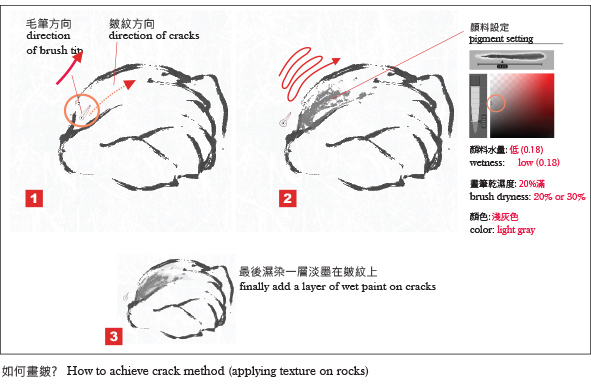
Use inclined brush to draw chapped stones, and set brush dryness and pigment wetness to low values.
Press hotkey 'x' to switch the brush to inclined brush (or press the 'Shift' key and roll the mousewheel together). After selecting color, set the wetness roughly to 0.18. Press number key '2' or '3' to set the brush dryness to 20% or 30% only. Rotate the mouse wheel so that the direction of the brush tip is roughly parallel to the direction of the cracks and then wipe back and forth along the dark side of the rocks. The pigment in the brush will use up. Put your finger on the key '2' or '3' continuously and press them to refill pigment when this happens.
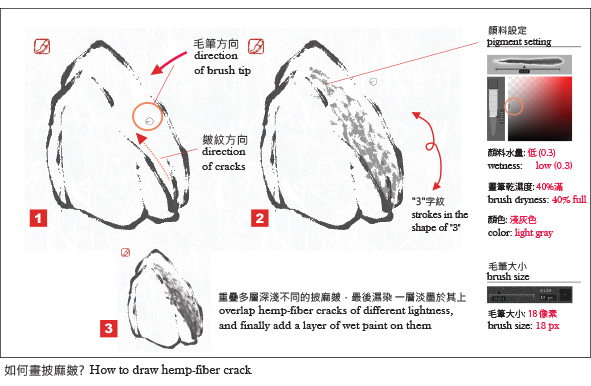
set the size of the inclines brush to be very small (diameter roughly as 20 pixels). Set the brush dryness to be low as well. Since the brush is smaller, slightly increase the pigment wetness to, says, 0.4 for easy wipping. The direction of brush tip should be perpendicular to the direction of crack. Hemp-fiber crack consists of strokes in the shape of "3". Overlap such strokes with varying density in the dark side of the rocks.
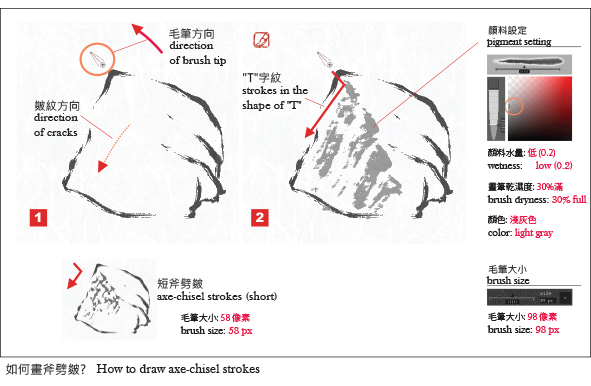
Axe-chisel stroke is done by one single wipe to form a surface, unlike the hemp-fiber crack which forms a surface by overlapping a lot of strokes. Set brush size to be large (e.g. diameter roughly 98 pixels). Use inclined brush. Adjust the length of the brush edge to match with the surface width by pressing the "Shift" key and rolling the mousewheel together. Short brush edge is easier to use. Set the pigment wetness to be 0.2. Press the number key “3” to set the brush dryness as 30%. Place the brush at the top of where the axe-chisel stroke will be created. The direction of brush tip is perpendicular to the direction of the stroke. The brush moves toward the opposite direction of the brush tip a little bit first and then turns 90 degrees and wipes downward quickly and largely. Remember to release the left mouse button before the brush reaches to the end of the stroke to make the end of stroke more loose.
If we set the brush size to be small (says, diameter as 58 pixels), brush edge to be short and wipes downward slightly, we can have axe-chisel stroke in short size
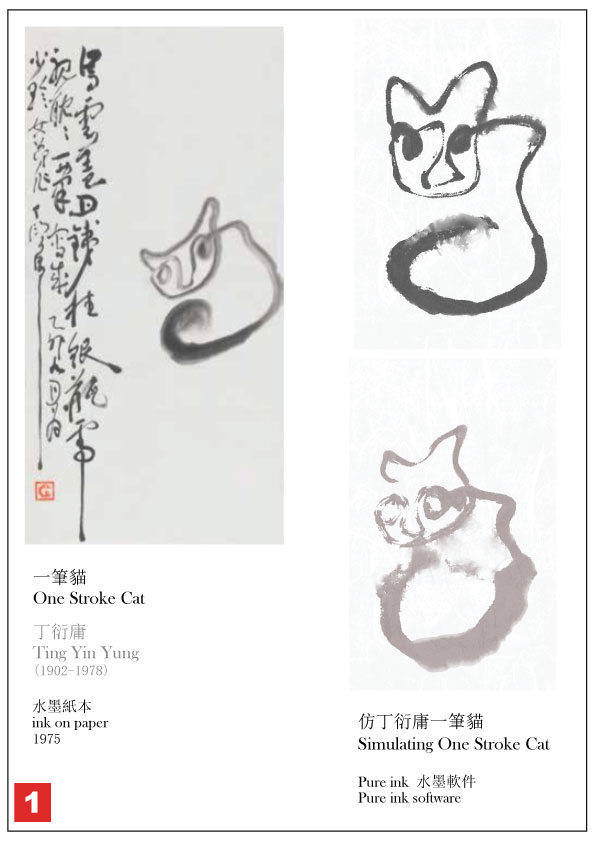
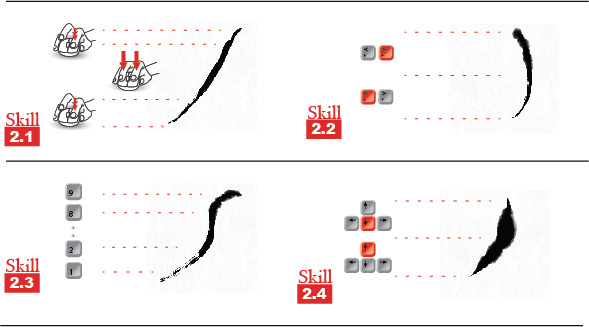
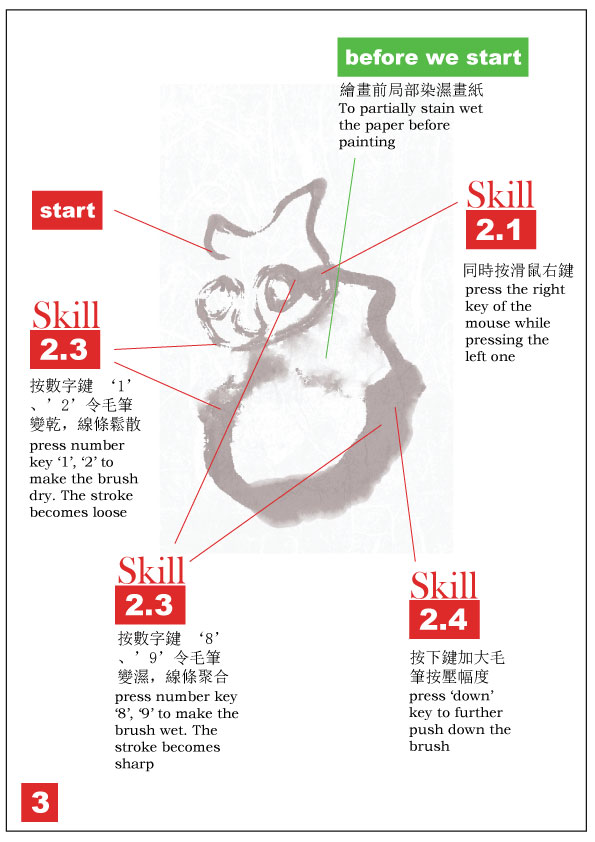
In Pure ink, we can draw stroke by mouse and simultaneously adjust the brush dryness, the pigment wetness, and the pressing force on the brush quickly through the use of shortcut keys. This brings changeable effects on one single stroke and helps simulate the one-stroke painting of Ting YinYung, a famous ink art master. The two examples on the right side of figure 1 are the effects completed with one stroke by mouse in the software.
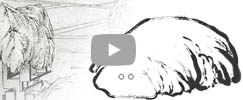
Step 1: To partially stain wet the paper
Use inclined brush (hotkey ‘x’), use lightest color, high wetness, press number key 8 or 9 to set the brush dryness to high level (means full pigmemt), randomly stain wet some areas on the paper so that the strokes that will draw on it can diffuse in different ways.
Step 2: To draw a cat by one stroke
Use vertical brush (hotkey ‘x’), set pigment wetness roughly 1.0, set the brush dryness around 6 or 7, do any of the following action(s) simultaneously while pressing the left key of the mouse to draw
1 press the right key of the mouse at the same time (i.e. pressing both the left and right key with two fingers together) to turn the vertical brush to side brush and this increases the thickness of the stroke. Releasing the right key turns the brush back to vertical. (figure 2.1)
2 press hotkey “,” or “.” to adjust the pigment wetness. This can make the pigment either wet or condensed (figure 2.2)
3 press number key “1” to “9” to change the brush dryness. This make the stroke either sharper or looser.
4 press the up or down key can change the pressing force to the brush and thus change the thickness of the stroke.
Finally we should beware of the dragging speed of the mouse. Dragging it with varying speed brings subtle change to the stroke. Besides, pressing left and right key can change the size of the brush.
Figure 3 indicates the changes that we made when we draw a cat by one stroke in Pure ink
Comparing with mouse, using wacom pressure stylus can achieve variable effects in one stroke more easily.
FAQ
The architecture of Pure ink software is specifically designed to achieve real time diffusion of colors and thus requires more computational resources to run when compared with other painting software. Besides, the software does not rely on the use of graphic cards. A computer equipped with a graphic card may not gain benefic in speed when running Pure ink. If Pure ink runs slow in your computer, you can:
set the paper size to be small (e.g. 500 x 500 pixels)
The wetter the paper, the slower will be the speed. You can set the paper to halfly or fully dry by selecting Diffuse > Quick Dry from the top menu bar if you don't need to keep the paper wet. This can improve the running speed.
Press the Tab key to pause the color diffusion. This can increase the running speed. After you finish several strokes, press the Tab key again to activate the color diffusion again.
Demonstration Videos
Short demonstration videos are available to guide you to paint different elements by using Pure ink. Some videos are narrated in Cantonese.
Kinetic Force is a mechanism in Pure ink that allows users to write Processing‑style code to generate dynamic and interactive visual effects for their digital paintings. This further extends the dimension of ink art to multimedia and reshapes this traditional art form in the digital era.
Kinetic Force uses the familiar Processing‑style, Java‑like syntax. It is closely align with Processing, a language widely recognized in digital media, famous for its simplicity and visualization capabilties. Starting from version 3.0.1, Pure ink provides vibe coding too.
We are developing Kinetic Force and right now it supports Processing's core, sound, and video library. It also allows interaction via mouse, keyboard, and webcam input. Custom library imports are not supported. More reference about these libraries are here:
Kinetic Force is a coding layer in Pure ink. To use Kinetic Force, you create such a layer with editor. After writing codes in the editor, you can run it to bring dynamic effects to your digital paintings. You can even transfer the effects on the paper layer for further developments, or output the dynamic effects by using the recorder in Pure ink as video.
Running Kinetic Force in Pure ink
You can create one Kinetic Force for each Pure ink file and it exists as a layer on top of the paper. Your code is stored in this layer and the generated visual effects overlap on the paper content.
To create a Kinetic Force, go to the top menu, select ‘Kinetic Force > Create’ to create a Kinetic Force layer. The editor will popup with a template for you to start coding.
Anytime you close the editor, you can reopen it by double clicking the Kinetic Force layer.
Selecting ‘Kinetic Force > Import” allows you to import a code file in txt format.
Vibe coding allows user to build a program using AI prompts instead of writing code manually. Pure ink already integrates with DeepSeek for this feature. To start vibe coding, go to the top menu and select ‘Kinetic Force > Create by AI’. Write down the programming effect you want to achieve in the text box which supports different language and click "Generate Code", Pure ink will translate your description into a specific prompt for DeepSeek Flash or Pro model. It then automatically creates a Kinetic Force layer with the returned code, ready for you to execute.
Code generation is currently free, but limited by a quota that is updated irregularly. Before the quota is exhausted and updated, the software can still generate custom prompts for users to generate Kinetic Force programs using other AI models. Click "Generate Prompt" button for such custom prompts.
To execute a Kinetic Force, you have two options.
The first option is to execute it by clicking the play button on the editor window directly. Please note that when the editor window popups, the whole interface is locked and not ready for any other activities. This option lets you test the code when you are writing it. The console in the editor window can display system message for you.
If the editor window closed, you can execute your code by the second option which is to select ‘Kinetic Force > Run’ from the top menu. Unlike the first option, this second option gives you more flexibility to control the playing. For example, you can swap between the Kinetic Force layer with other layers when it is playing, or you can transfer the Kinetic Force effects on paper at any time when it is playing. You usually play by using this option when you finish coding.
Pure ink lets you showcase your dynamic effects in different ways.
By selecting ‘Kinetic Force > Exhibite’ from the top menu, Kinetic Force will be executed first, and Pure ink will start full screen display immediately afterward. You can connect your computer with projector for exhibition purpose.
You can record your Kinetic Force effects as MP4 video. First of all, run your Kinetic Force by selecting ‘Kinetic Force > Run’ from the top menu. After your Kinetic Force is executed, go to select ‘Record > Record’ from the top menu. In the MP4 Quality window, make appropriate settings for recording and click ‘Ok’ to start MP4 recording for all activities on your paper.
Alternatively, you can also do recording for painting actions on paper without the presence of Kinetic Force.
Like the image layers, the graphics generated by the Kinetic Force layer is also available to be transferred onto the paper for painting purpose. Anytime when you are running your Kinetic Force by clicking ‘Kinetic Force > Run’ from the top menu, you can further click the ‘Transfer’ button in the Layer Panel. After you set the transfer preference in the Image Transfer window and click ‘Ok’, the graphics generated by your code can be transferred onto the paper.
Combining coding and handcrafted painting, it gives you innovative ways to do digital creations.
Understanding Programming this section is for users who have no background knowledge of programming, if you already learnt it, simply skip this part.
Variables are like boxes that store data while a program is running. They are fundamental because program execution heavily involves reading from and writing to variables.
Variables have types, and each variable stores data of its declared type. Common types include integer, floating-point, string, character, boolean, and color. To use a variable, you declare it and then initialize it. To declare a variable, start with the data type keyword followed by the variable name, for example:
int myNumber;
float myFloat;
String myName;
char myChar;
boolean myBoolean;
color myColor;
to declare variables
To initialize a variable, we assign a value to a variable with the use of “=”, such as:
Variables are often used in calculations, such as:
myNumber_A = myNumber_B + 3;
The right-hand side of the “=” is evaluated first: the value stored in myNumber_B is read and 3 is added; the result is then written to myNumber_A. Many calculations occur as a program runs, so variable values can change over time.
Because visual effects depend on variable data (for example, a graphic’s position depends on positional variables, and its color depends on color variables), changing variable values lead to changing visual effects—this is a key principle in digital art practice.
A function is like a blender: you put in fruit (inputs), it processes them, and you get juice (output). It follows the steps of input, processing, and output, and is designed to perform a specific job.
In programming, a function is a self-contained block of code that performs a single task. Like a blender, you pass data to a function and receive a result from it. We write functions to solve complex problems efficiently by breaking them into smaller subproblems; each subtask is handled by a dedicated function. When each function works correctly, the overall problem can be solved.
A function typically looks like this:
int calculate (int A, int B, int C)
{
		int answer;
		answer = A + B – C;
		return answer;
}
In this example, “calculate” is the function name defined by the user. A, B, and C are parameters that receive data from the caller. The keyword “int” before the function name indicates the return type; here, the function returns an int—the value stored in “answer”—via “return answer;”.
To execute this function, call it in your program like this:
int myAnswer;
myAnswer = calculate(3, 4, 1);
The values 3, 4, and 1 are passed to the parameters A, B, and C of calculate(). Inside calculate(), the expression 3 + 4 - 1 is evaluated, yielding 6, which is returned and stored in myAnswer.
To understand class, imagine a circus.
Inside this exciting and busy circus we have different objects like the circus owner, tiger, spotlight, and many others. Each of them has their own characteristics. The circus owner has funds on hand. He is probably a fat guy with heavy weight and short height. The tiger has emotion, and probably heavier and shorter than the circus owner. The spotlight has a color filter that emits light in a specific color. Each of them can also perform certain tasks. The circus owner is good at roaring and ordering. The tiger is skillful in jumping through the fire ring. The spotlight can either switch on or off at different moments. To summarize, each object has its own characteristics and skills:
Circus Owner:
			characteristics: funds, weight, height
			skill: roar

Tiger:
			characteristics: emotion, weight, height
			skill: jump

Spotlight:
			characteristics: color
			skill: switch on, switch off
A circus performance is the interaction between objects. The owner roars at the tiger; the tiger jumps through the ring of fire; then the spotlight switches on to celebrate. Each object executes its own skill to act or to influence other objects. We can denote this with the syntax object.method, meaning “the object executes its method.” For example: circusOwner.roar(), tiger.jump(), spotlight.switchOn(). When circusOwner.roar() happens, it can trigger tiger.jump() and spotlight.switchOn().
Back to our topic, class refers to the circus owner, tiger, and spotlight in our example. A class has its own properties (represented as variables) like the characteristics owned by the circus owner, tiger, and spotlight. A class also has its own methods (represented as functions) like the skills owned by the circus owner, tiger, and spotlight. In object-oriented programming like Java and Processing, programs model the world as objects, and execution is the dialogue between objects (method calls). A class definition typically looks like this:
class CircusOwner			// class name starts with a capital letter
{
	int funds;							// porperty
	int weight;

	CircusOwner()				// constructor of a class
	{
		funds = 100000;
		weight = 100;
	}

	void roar()					// method
	{
		// to influence other objects to act (assumes these objects exist)
		tiger_tommy.jump();
		spotlight_num1345.switchOn();
	}
}
A class is a concept; an instance of a class is the concrete object that actually exists at runtime. It is possible that we can have two individual tigers, Tommy and Cindy, belonging to the same class “Tiger”. In our circus example, we declare instances (objects) of the classes CircusOwner, Tiger, and Spotlight like this:
Each instance must be initialized before use by calling the class’s constructor. A constructor is a special function with the same name as the class; we typically initialize properties inside it. Initialization looks like this:
andy = new CircusOwner();
tiger_tommy = new Tiger();
tiger_cindy = new Tiger();
spotlight_num1345 = new Spotlight();
Once initialized, these objects can interact: andy.roar() may trigger tiger_tommy.jump() and spotlight_num1345.switchOn().
To write code in Pure ink, you are writing code for a class called KineticForce. To understand the relation between Pure ink and Kinetic Force, imagine Pure ink as a bustling city and the KineticForce class as the circus within that city. When you write Kinetic Force code, you create objects in this circus (e.g., circus owner Andy, tiger Tommy), plan their interactions, and direct the show.
Technically, you declare variables and define functions (methods) in the KineticForce class. Those variables are often instances of existing classes available in the Kinetic Force environment, for example PImage for images, String for text, and SoundFile for audio. You can also define new classes as needed for your project.
To position and animate your graphics correctly, you need to understand the coordinate system used on a digital screen. It differs slightly from the one used in mathematics. The x-axis still increases to the right, but the y-axis increases downward. The origin (0, 0) is at the top-left corner of the screen, so all on-screen x and y coordinates are non-negative.
Writing Kinetic Force
Technically speaking, Kinetic Force is a class extended from Processing's PApplet class and run by Pure ink. The name of the class is 'KineticForce'. Its core parameters are 'g' in PGraphics type, 'width' and 'height' in integer type. It has three compulsory core functions which are the constructor of itself called 'KineticForce()', 'setup()', and 'draw()'. A typical structure looks like the following. When you create a Kinetic Force in Pure ink, you will be given this template. Please add your variables, write the setup() or draw() functions based on your needs.
class KineticForce extends PApplet
{
	// to declare self-defined variables here...

	KineticForce(PGraphics g, int width, int height)
	{
		// leave it blank
	}

	void setup()
	{
	}

	void draw()
	{
	}

	// self-defined classes or self-defined functions are here...

}
a template of KineticForce class
For Processing users, the transfer from Processing code to Kinetic Force is very easy and explained by the following diagram. All global variables in Processing code are considered as the internal variables of KineticForce class. All core and custom functions and classes in Processing code are considered as the internal functions and classes of KineticForce class.
Pure ink runs the codes in setup() only one time at the beginning of execution. It runs setup() just after running the constructor. In setup(), you can initialize custom variables and do any actions that are required to be done in one time at the beginning of the execution. For example, setting the background, or displaying a still image, etc. Unlike Processing, size() is not used in setup(). More information can be found in the next section: "core variables: 'g', 'width', 'height'".
On the other hand, draw() is a function which runs iteratively after you execute Kinetic Force. It keeps running until you stop it. Thus, you write your code in this function to achieve continuing effects. For example, making a graphic move, changing the screen color continuously, etc. Graphics drawn by draw() function in each frame will be accumulated in the Kinetic Force layer. You usually need to clear the graphics from the last frame by resetting the background color (i.e. use background()) for animation purpose.
Unlike Processing, in Kinetic Force, you need to include draw() in your code even you do not have to program any moving effects. Simply leave it blank if you do not need it.
KineticForce class has three core variables: ‘g’, ‘width’, and ‘height’. Pure ink passes them to the constructor of KineticForce when you create it. The ‘g’ is in PGraphics type and it is the canvas where your code draws graphics on.
General users do not need to care about this 'g'.
The ‘width’ and ‘height’ are in integer type and they are the width and height of the paper that your Kinetic Force associated with. You can directly refer to them in your code. Unlike Processing, you cannot specify the 'width' and 'height' by yourself through size() since the size of your Kinetic Force is already preset as the size of the Pure ink paper and not changable. In fact, you cannot use size() in Kinetic Force.
KineticForce(PGraphics g, int width, int height)
{
	// leave it blank
}
Color is a datatype. Color information is stored in variable of such type and usually represented by three digits of RGB code. We go through three steps to set and apply color. The first step is to declare a variable of color type. Secondly, we create a piece of color information via color() function and store it in the color variable. The last step is to apply the color to fill the body of a graphic (via fill()) or to fill the stroke of it (via stroke()). You can also apply the color to the background (via background())
void setup()
{
	// create variable of color type
	color c;
	// create a dim red color, save it
	c = color(200, 100, 100);
	// apply this color
	fill(c);
	// draw a rectangle
	rect(0, 0, width, height);
}
to set and apply color by three steps
A fourth channel (alpha channel) can be included to represent transparence, shown in the following full example code.
class KineticForce extends PApplet
{
	// alpha value, changed from 0 to 255
	int alpha;
	// either ‘-1’ or ‘1’, the change on ‘alpha’
	int step;

	KineticForce(PGraphics g, int width, int height)
	{
		// leave it blank
	}

	void setup()
	{
		alpha = 0;
		step = 1;
	}

	void draw()
	{
		// clear the background for upcoming frame
		background(255, 0);
		color c;
		// create a dim red color with alpha channel
		c = color(200, 100, 100, alpha);
		fill(c);
		rect(0, 0, width, height);
		// increase or decrease the alpha value
		alpha = alpha + step;

		// reverse 'step' if alpha is too high
		if (alpha>255)
		{
			step=-1;
			alpha=254;
		}
		// reverse ‘step’ if ‘alpha’ is too low
		else if (alpha<0)
		{
			step=1;
			alpha = 1;
		}
	}
}
change the alpha channel continuously
Color can be represented by HSB code too. Using colorMode() to change the mode between RGB and HSB.
We usually make background transparent by providing an alpha channel to background(). This is because the Kinetic Force graphics are displayed on top of the paper layer in Pure ink. Setting the background transparent allows the painting on paper and the contents of all layers beneath Kinetic Force layer to be seen when Kinetic Force is being executed. Besides, we usually put background() in the first line in draw() if we intend to do animation. This removes graphics in Kinetic Force layer from the last frame and prevent them from accumulating. Comparing the following three examples which draw random points on a digital painting:
void draw()
{
	// set the background transparent
	background(255, 0);

	// add random points on the painting
	for (int i=0; i<10000; i++)
	{
		int R = round(200 + 50 * random(0.5,1));
		int G = round(200 + 50 * random(0,1));
		int B = round(200 + 50 * random(0,1));
		int x = random(0,width);
		int y = random(0,height);
		color c = color(R,G,B);
		stroke(c);
		point(x, y);
	}

	delay(200);
}
example 1: points from the last frame are cleared, and the background is transparent which shows the painting
void draw()
{
	// background color is not transparent
	background(255);

	for (int i=0; i<10000; i++)
	{
		int R = round(200 + 50 * random(0.5,1));
		int G = round(200 + 50 * random(0,1));
		int B = round(200 + 50 * random(0,1));
		int x = random(0,width);
		int y = random(0,height);
		color c = color(R,G,B);
		stroke(c);
		point(x, y);
	}

	delay(200);
}
example 2: background is white but not transparent, point does not accumulate but the background hides the painting
void draw()
{
	for (int i=0; i<10000; i++)
	{
		int R = round(200 + 50 * random(0.5,1));
		int G = round(200 + 50 * random(0,1));
		int B = round(200 + 50 * random(0,1));
		int x = random(0,width);
		int y = random(0,height);
		color c = color(R,G,B);
		stroke(c);
		point(x, y);
	}
	delay(200);
}
example 3: this example does not set background color, points generated by previous frames accumulate on screen.
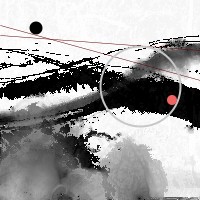
Simply use Processing functions to draw graphics with different settings of position, size, and color.
Technically speaking, all graphics generated by Kinetic Force are drawn on ‘g’, a variable in PGraphics type passed to KineticForce class by Pure ink. The content in ‘g’ will then be displayed by Pure ink when you execute your code.
void setup()
{
	// two inclined strokes in dim red
	stroke(100,0,0);
	strokeWeight(0.5);
	line(0,35,width,50);

	// two inclined strokes in dim red
	stroke(100,0,0);
	strokeWeight(0.5);
	line(0,35,width,50);
	line(0,25,width,80);

	// the bigger circle
	stroke(200);
	strokeWeight(2);
	noFill();
	circle(140,86,80);

	// the small black circle
	noStroke();
	fill(0);
	circle(36,28,13);

	// the smallest red circle
	fill(240,100,100);
	circle(172,100,10);
}
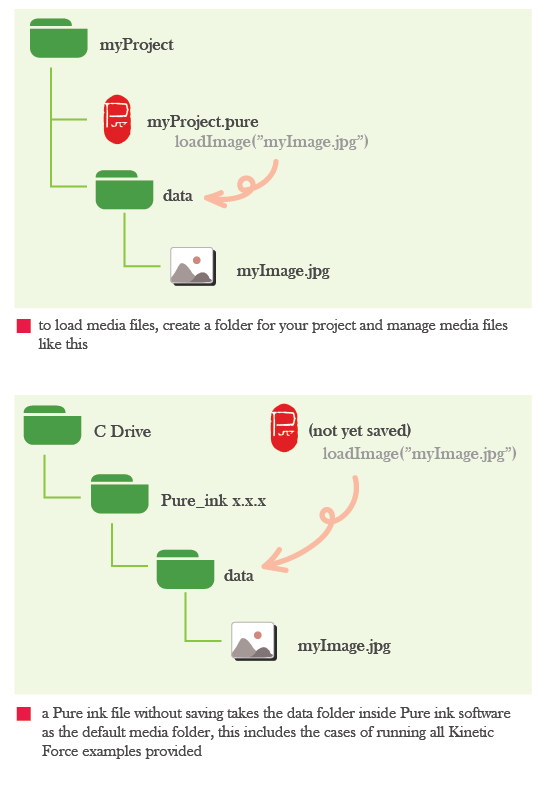
Kinetic Force follows the same strategy in Processing to load and save media files. Here we takes file loading as example to explain. The same strategy also applies on the saving case. When you load a media file via functions like loadImage(), Kinetic Force assumes the existence of a folder namely ‘data’ in the same working directory of your Pure ink file, and then fetch the media file from this ‘data’ folder according to the relative path that you provided in loadImage(). For example:
to load and display an image on the right hand side of the paper
In this example, if you save your Pure ink file on Desktop, Kinetic Force will look for a folder namely ‘data’ in Desktop and then fetch ‘myImage.jpg’ from it. Thus, if your Kinetic Force involves media file loading, you are recommended to create a working folder with whatever name you like first. Then you save your Pure ink file in it and create a ‘data’ folder in it too. Put all media files into that ‘data’ folder so that you can load them by your Kinetic Force.
Please note that, if you run the Kinetic Force examples provided in Pure ink directly (by selecting 'Kinetic Force > Examples' from the top menu) without your Pure ink file being saved before, Pure ink looks for media files from the ‘data’ folder of the directory where your Pure ink software installed. That should work since the media files are already included in that ‘data’ folder when you install the software. On the other hand, if you try running those Kinetic Force examples but you have saved the Pure ink file to a specific directory before, then the loading does not work anymore unless you move the media files to a ‘data’ folder inside that directory.
To achieve mouse interactivity, we always have to know where the cursor is now located and respond accordingly. Following Processing, Kinetic Force also stores the current position of cursor in mouseX and mouseY, and the previous position of cursor in pmouseX and pmouseY.
void draw()
{
  background(255,0);
  stroke(128);
  for (int i=0; i<200; i=i+20)
  	for (int j=0; j<200; j=j+20)
    {
      // calculate the distance between (i,j) and (mouseX, mouseY)
      float dist = sqrt(pow((i-mouseX),2)+pow((j-mouseY),2));

	  // 'distRatio' tends to be 0 if 'dist' is small
      float distRatio = (dist/290);

      // based on a sigmoid function, 'size' tends to be zero only
      // if 'distRatio' is very small, otherwise it tends to be 20,
      // this only makes the boxes closed to cursor be very small
	  // but preserves the size of the other boxes
      float size = 20 / (1 + exp(-30*(distRatio-0.1)));

      // the boxes closed to cursor is more semi-transparent
      float alpha = 200 + 55 * distRatio;

      fill(180, alpha);
      rect(i,j,int(size), int(size));
    }
}
when cursor moves, the cubes closed to the cursor will be scaled down and uncover the painting
When user makes actions on the mouse, mouse listeners will be triggered and this allows you to respond to the actions by writing code in these listeners. Mouse listeners are simply functions. You can write your code for them as how you do for the other functions.
class KineticForce extends PApplet
{
  float alpha;

  KineticForce(PGraphics g, int width, int height)
  {
    // leave it blank
  }

  void setup()
  {
    alpha = 255;
  }

  void draw()
  {
    background(255,0);
    stroke(128);
    for (int i=0; i<200; i=i+20)
      for (int j=0; j<200; j=j+20)
      {
        fill(180, alpha);
        rect(i,j,20,20);
      }
  }

  void mousePressed()
  {
    // reduce alpha when user click the mouse
    alpha = alpha - 30;
    if (alpha<0) alpha = 0;
  }
}
everytime when user makes a mouse click, the painting is shown clearer.
Like mouse detection, keyboard detection is achieved through keyboard listeners like keyPressed() and keyReleased(). When a key is pressed or released, the related listeners are triggered and the code inside them will be executed. We check the ‘key’ and ‘keyCode’ to determine which key is triggered.
class KineticForce extends PApplet
{
  int x;          	// x position of the green dot
  int y;          	// y position of the green dot
  float speed;    	// speed of the green dot
  float size;     	// size of the green fot

  KineticForce(PGraphics g, int width, int height)
  {
    // leave it blank
  }

  void setup()
  {
    x = 100;
    y = 100;
    speed = 0;
    size = 11;
    noStroke();
  }

  void draw()
  {
    // only draw after the dot move a while,
    // avoid the starting point be too dark
    if (speed>0.3)
    {
      fill(20,60,20,20);
      circle(x, y, size);
    }
  }

  // set the start point of the dot
  // based on a mouse click
  void mousePressed()
  {
    x = mouseX;
    y = mouseY;
  }

  // user control the movement of the dot
  // by arrow keys. When the dot moves, its
  // speed increase but size decrease
  void keyPressed()
  {
    if (key == CODED)
    {
      if (keyCode == UP)
      {
        y = round(y - speed);
        speed = speed + 0.1;
        size = size - 0.3;
      }
      else if (keyCode == DOWN)
      {
        y = round(y + speed);
        speed = speed + 0.1;
        size = size - 0.3;
      }
      else if (keyCode == LEFT)
      {
        x = round(x - speed);
        speed = speed + 0.1;
        size = size - 0.3;
      }
      else if (keyCode == RIGHT)
      {
        x = round(x + speed);
        speed = speed + 0.1;
        size = size - 0.3;
      }
    }
  }

  // reset the speed and size when user
  // release any key
  void keyReleased()
  {
    speed = 0;
    size = 15;
  }
}
pressing arrow key to move a green dot on a painting for artifical effect, making a mouse click to reset the starting point of the dot.
.jpg)